Your cart is currently empty!
How to Make a Pot Holder, Hot Pad, & Trivet
These instructions are designed for someone who has never sewn a thing before in their lives, but could totally be used by someone who already has a good deal of experience sewing. For the more advanced seem-artists, the instructions you need will be in bold. The rest of the instructions will cover minute details for the absolute beginner!
*This page contains affiliate links. If you choose to make a purchase after clicking a link, I may receive a commission at no additional cost to you.
Instructions
Materials:
- Six 10″x10″ (10 inch by 10 inch) squares of fabric.
- One 10″x10″ square of batting (batting should be Insul-Bright, Wrap-N-Zap, or 100% cotton in order to hold the heat)
- Scissors
- Thread and needle or sewing machine (this project could be hand sewn, however these instructions are written for a sewing machine)
Steps:
1. Choose your favorite fabric. Note: it is always a good idea to make your first version of any project with a fabric you hate. That way, if you mess up, you haven’t ruined your good fabric. I recommend using 2 or three different patterns or colors for this project. In this example I have used 3 colors, but here is an image of a few I made with just 2 colors.
2. Cut out six 10 inch by 10 inch squares of fabric.
In this image, you can see I’ve selected 3 colors all with a similar pattern. You might also have noticed that all the sides have a jagged edge. This means they were cut with a special pair of scissors called Pinking Shears. These fancy scissors have a jagged edge on them, and this helps prevent the fabric from fraying.
You can purchase these exact pinking shears by clicking on the image or the linked words above, however pinking shears are not necessary for this project.
If you are reading this and you have not purchased your fabric yet, or you think you might want to make a lot of hot pads, you might consider buying pre-cut fabric. The reason my fabric has the pinked (or jagged) edge is because I am using pre-cut fabric. I got mine from JoAnn’s, and they came in sets of twenty 10”x10” sheets, which is perfect for this project!
Here is the label for the ones I bought:
However, you can also order pre-cut fabric online and get it delivered right to your door!
Here is a bulk option on amazon for some really cute 10”x10” squares, but with a little research, or a trip to the store, you could find some that definitely suits your style! I haven’t ordered this specific set from Amazon myself, but a different, 8×8 set I got came all printed on one big sheet of fabric and I had to cut them all out myself, so just note, that could be the case with this one as well.
3. Cut out one 10”x10” square of heat resistant batting. Batting is the material that goes between your layers of fabric to help give it a quilted look, give it some height, and in this case, to also help protect your surfaces from hot pots and pans. In this tutorial I used Wrap-N-Zap but you could also use insul-bright. Wrap-N-Zap is microwaveable and therefore more popular in bowl cozy projects, and insul-bright has a special lining that makes it useful for hot pad, pot holder, trivet, and oven mit projects, but it can not be microwaved.
4. Iron your backing pieces flat and your decorative pieces into a large triangle (folded on the diagonal). For this design, 2 exterior pieces will serve as the heat protectant part, and 4 pieces will be mostly decorative. I chose to use the green for the backing and ironed it flat.
I used the purple and teal pieces for the decorative ones. Take one corner of your square and fold it in half into a triangle, placing it even with the opposite corner. Then press it flat so it stays folded nicely.
5. Stack your outer pieces with your batting sandwiched in between. Start by placing one outer piece of fabric face down on your work surface.
Place your batting down on top of the backing fabric, lined up as neatly as you can.
Then place your other inner piece on top of that.
6. Pin or clip your edges. This will help hold all the fabric in place. Sewing clips are not necessary, but I just got myself some for christmas and I find that for small projects, I like them much better than using pins. These are the ones I bought myself, and they’ve been great so far!
7. Stitch a design onto the pinned layers to permanently fix the fabric in place. This step is actually called quilting! Any time you sew fabric together with batting to hold layers together, that’s quilting!
For this project, I quilted a cross through the center of each edge, then an X through the corners. Here is what that looks like. It’s not super clear, but you can see the white thread lines through the fabric in this picture.
9. Trim your threads. When you use a sewing machine, you generally end up with long threads hanging off the ends of the project. Before we move on to the next step, you want to trim these off.
10. Lay your first decorative fabric piece on top of the base piece you just quilted.
Line the three points up evenly with the corners of the base piece.
11. Place the next decorative piece (in a different color/fabric) in the next corner.
12. Do the same thing with the next decorative piece.
Ideally this piece should match the first one you laid down.
13. Fold back the corner of the very first piece you laid down in the area where it covers your base layer fabric.
14. Place the final decorative piece over top of the remaining base fabric, and the last piece you laid down.
15. Fold the corner of the first piece you laid down back down over the newest piece.
Every corner should now have 4 layers. The base quilted piece, two end points, and one main corner between the two end points.
16. Straighten out and pin or clip all the edges and corners.
17. Sew all the way around all four edges.
You do not need to leave any openings, you can sew the entire square edge. The snip your stragglers.
18. Trim your corners. Get as close to the stitch line as you can without going over it.
19. Turn the project right side out. There will be a hole in the middle of your decorative pieces. You can pull these apart and flip it inside out (outside right).
20. Use a dull object to turn your corners. Something like a chopstick can help make sure your corners are nice and crisp without being too sharp to poke a hole through your corner.
21. Iron your project for nice crisp edges.
And, you’re done! Congratulations!
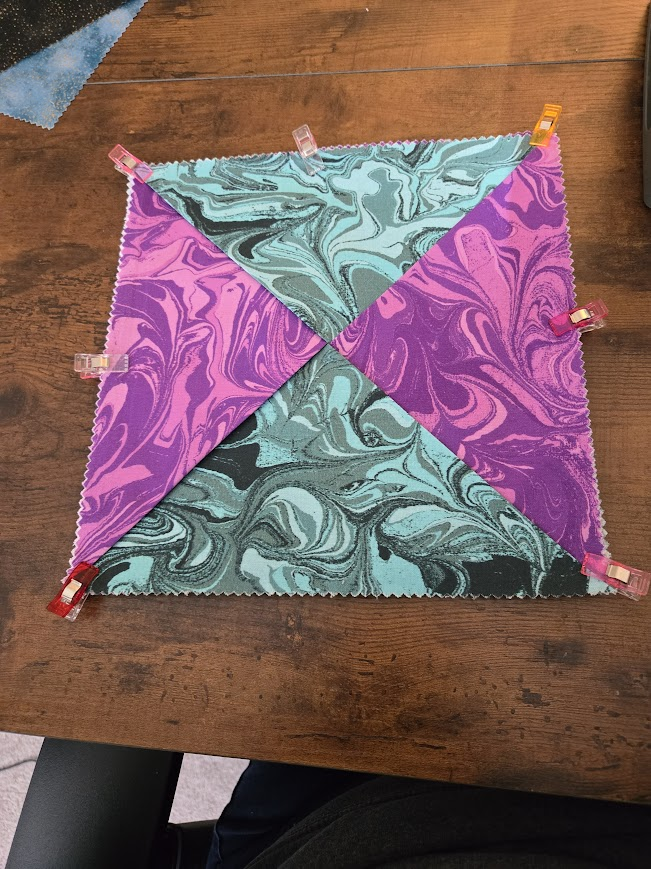
Your finished and turned hot pad should look like this:
Tata for now!
~Meagan
Category :
Share :
Related Posts
-

Financial Recovery Journey
Financial Recovery Journey I’ve got nearly $100k in debt, between my student loans, my car, and a few credit cards and just this past week I started my financial recovery journey. My best friend told me before christmas that she wanted to focus on money in 2025, so as a christmas gift I bought her…
-

What is Wrong with Being Single?
What is Wrong with Being Single? Essentially, this is a journal entry, in which I try to sort out my feelings on being single vs wanting a relationship. I think I am going in with the ultimate goal of convincing myself that I don’t actually need a relationship, but along the way I’m hoping to…
-

How to Make a Pot Holder, Hot Pad, & Trivet
How to Make a Pot Holder, Hot Pad, & Trivet These instructions are designed for someone who has never sewn a thing before in their lives, but could totally be used by someone who already has a good deal of experience sewing. For the more advanced seem-artists, the instructions you need will be in bold.…

Meagan
Looking for Joy wherever I can find it!
Subscribe and follow
Popular Post
Subscribe To My Newsletter
Join me on this journey!
This is Bear, she says hi.

